Archive for garden tips – Page 5

Attack of the Root Weevils in Portland Shade Gardens

Why you should care about root weevils, and what to do about them once you do.
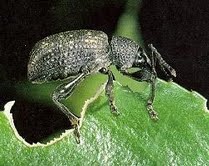
Many Portland established shade gardens have  leaf damage from adult root weevils (see photo showing leaf notching). It is ugly, but it doesn’t kill your plant. A lot of leaf notching can spoil the looks of the plant just when you wanted to enjoy its beauty. The serious problem is caused by their larvae who eat the roots of your plants during the late fall and winter. It is very difficult to kill the larvae because they live underground nestled into the roots of your plants to be close to their chosen food source. Think of them as tiny, tiny zombies! Rooooooooooooooootttttssssssssssssss………..

So how do you know if you have a root weevil problem? Here is what I recommend:
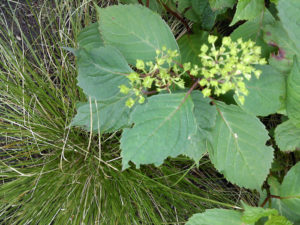
Root weevil damage on hydrangea in Portland landscape design

It’s the damage done to the roots that we worry about. We must control the adult weevil before she lays her eggs.

Check your indicator shrubs for notching! These are Hydrangea, Red Twig Dogwood, Azalea, and Rhododendrons. Many perennials will also show the notched leaves such as Hostas and Coral Bells (Heuchera).  If you have only a few notches, you don’t have to do anything or you could treat once a year as a preventative measure.  If you have more than a few notches, we need to talk but you can also check out my other root weevil blog for all the gory details of killing root weevils.  It is tricky to do.

Don’t bring them into your garden………Here is a timely tip, be very picky about buying plants on discount, or at fundraisers!  Look for notching on the leaves, and don’t buy any plant that has notching, or is near plants with notching.  Root weevil can walk over to the plants near by and lay eggs so even if there is no notching on a plant there are probably eggs in the potting soil.  You don’t want to introduce them into your garden. (I’m not saying they came from your freshly purchased potting soil….root weevil just walk from one plant to another and lay their eggs.)

Now the important part. How do you get rid of them?  Hand picking is the easiest to actually do but they can be very hard to spot.  This dull colored beetle is only 1/4″ and hides effectively in the top of the soil or inside a leaf crevice. It can take checking your plants several evenings a week with a flashlight to find even one.

The chemical products out there are harmful to you and the bees which we need in order to have food. Using chemicals to get rid of root weevils is definitively not the way to go.

I purchase living nematodes that are specifically listed for root weevil. Properly applied, they will swim through your soil, enter the body of the root weevil larvae, and lay their eggs. The nematode hatchlings will eat the larvae. Initially you will do this in both September /early October and the following May which are the ideal nematode vs. larvae times!

The 3 most important things:

The soil must be warmed up and moist

You must apply the nematodes at dusk, never in direct sunlight.

Get the timing right-treat in May or early June.  Treat again in September.  If we are having a cool May you may want to wait until June.  In September you want to be sure your soil is well watered prior to the treatment of nematodes, and then water well for two weeks following the treatment. This will eliminate some of the root weevil problem for the next year.  You will have to repeat the biannual treatments for a few years to get the weevils properly controlled, and then continue with a once a year preventative treatment cycle (in September).

You’ll get better results if you use Pondzyme in the water before you add the nematodes.

The good news is that it is really easy to do…ok it’s tedious but your shade garden can look so bad if root weevils become numerous.
1) Take a 5 gallon bucket and fill it up with water.
2) Treat the water with a product called pondzyme (people use it to protect their fish from the additives in our water). I use 1 and ¼ teaspoons of Pondzyme to 5 gallons of water.
3) Add the nematodes to the water.
4) Using a plastic pitcher, not metal, I then water the nematodes into the soil where I see leaf notching.
It is very little effort for a dramatic and healthy result.   Good gardening!

Resources:

March Biological is mail order.  I like them.
Living nematodes for root weevil larvae can often be purchased May through September at: Portland Nursery
http://www.portlandnursery.com/
Farmington Gardens
http://www.farmingtongardens.com/
Cornell Farms
http://www.cornellfarms.com/
and other higher end garden centers.
Tranquility Ponds has 3 locations and they sell an 8 oz bottle of Pondzyme for $26.00.  Remember you need the pondzyme to protect your nematode warriors from chemicals in our water so don’t skip this step.  It is very concentrated so it should last you a very long time.    http://portlandpondsupplies.com/

Hydrangea Love

Designers mom with  favorite hydrangea

My Mom with Oliver, the Hydrangea

Hydrangea Love

There are several lessons in this story for you, O gentle reader………..how to successfully transplant a shrub or tree in July heat……, how to prevent hot weather damage to your plants when we have intense hot weather right on top of weeks of cool rain, (more critical if you agreed to have your garden on a fundraiser tour).  This will also work to restore plants in a container that you forgot to water???? ……………..these helpful lessons all fit into this story.

The story:  My mom and dad planted and named the two hydrangea by the back patio, Mary and Oliver.  Mary was beautiful no matter what but Oliver had troubles.  Every year in early summer, Oliver’s flowers would get crisped.  If they had planted Oliver a few feet closer to the covered patio there would be no problem and no story.   They planted Mary in the afternoon shade of the patio but Oliver got the early afternoon sun in June and July. He was just not a super sun tolerant kind of guy.

He could handle the sun better once the leaves and petals had hardened off in July but in early June, while the leaves and petals were full of spring, freshly unfurled, a 100 degree day or two would toast all the new flowers on the plant.  So Oliver’s flowers would scorch and my parents would then over water Oliver trying to get some water back into his petals. They did not understand that once petals are scorched they stay that way. Oliver’s new flowers were fine but now the plant’s leaves looked terrible. Over watering caused the leaves to wilt and yellow. Oliver was a mess.  I offered to come over and protect Oliver from them. The human Mary and Oliver had long since gone on so these were not really plants to my parents, but symbols of their dear friends.

Protecting plants from heat stress in Portland Area Landscape Design

The Sheet Trick

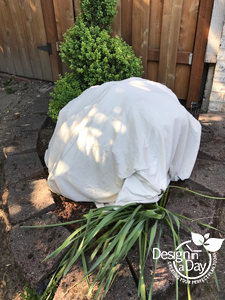
So how did I do this?  The Sheet Trick!  My first solution was to water once a week and the second solution was to protect Oliver from intense sun.  My solution was time consuming mostly because I lived in NW Portland and my parents lived in Gladstone.  If I was expecting intense sun,  I would drive over, get out some binder clips, drape a white sheet over Oliver to cover all his leaves and flowers and then clip the sheet onto various large stems so it could not blow off.

Because the leaves were covered (this is science folks!) they held in the water rather than letting it go, this is called transpiration. Transpiration is part of the plants photosynthesis process with the sun.  See Wikipedia on photosynthesis.  Since the flower petals and leaves kept their water, they stayed cool enough and did not scorch. I would not leave the sheet on for more three days at a time so I didn’t have to go over there every single day, just when I knew it was going to be hot.

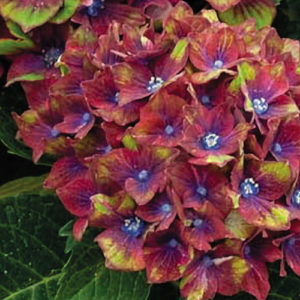
Hydrangea PistachioWhat’s important for you gentle reader is that this sheet trick is handy beyond belief for all kinds of things.  Number 1  best tip ever for transplanting a shrub in the summer…….keep it covered for 3 days and I mean immediately or even during the digging of the plant if you are feeling compulsive.  Use it to protect flowering plants if we have intense heat while the flower petals are still new and soft. Use this trick if you have had an irrigation boo boo and your plants in one area didn’t get any water and  have wilted.  Presto, sprinkle the leaves with water gently, water the plant and cover for a few days……..your plant will have a better chance of recovery.

Every generation loves hydrangeas, my parents loved theirs, I love them although confess I have none of my own down here on the floating river house, my step daughters would love to have them…..maybe I can fix that this year.  They also look mighty fine with ornamental grasses so not just for an old fashioned garden but could be used in more modern gardens if placed thoughtfully.

Easy Edible Plants: Blueberries

Blueberries very easy edible plants. Blueberries are great for your brain. Did I mention easy? Once your plants are established, the trick to growing blueberries is proper pruning. We want to encourage new growth and to do that, we have to remove some of the old growth. This is a great thing to do together on a garden coach appointment. Do mulch around your plant periodically with coffee grounds to increase acidity in the soil (any time of year works for this – you could do it up to ten times per year! ) Don’t use peat moss even if other experts say to do it.

Bulbs: Low Maintenance Beauty

Bulbs can be the ultimate low maintenance plant, just pick the right ones and get them out of the garage. (Yes thousands of bulbs selected with great anticipation live and die in the garage.) Please don’t feel bad and give up on bulbs. Everyone has done this. Garden Coach makes the time and sets up the structure to get the right bulbs planted in the right place in your garden. We are placing orders now. Read on for a few quick picks of my favorite bulbs.

Here is my list of easy to find bulbs with graceful demise.

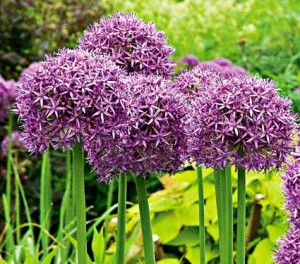
  1. Alliums, lots can and is written about the good ones, (yes there are bad ones, avoid anything that says naturalizes). My top 3: Spring Allium Karativiense ‘Ivory Queen’, Early Summer Allium Cernuum; and Summer. Allium ‘Globemaster’.  Mix ’em up with daisy headed flowers for great contrast.
  2. Species Tulips – my favorite is the Greigii Tulips because their foliage is attractive with purple splotches. They are shorter at about 10 inches tall and so less likely to fall over with heavy rains. My personal Greigii favs are Oratoria or hot colored Toronto. Other more delicate looking types such as T. Clusiana Cynthia spice up the garden (reds) and open and close, showing off bright yellow and intricate interiors.
  3. Camassia – awesome blue flower, a native plant that can handle clay or heavy
    soils and then goes dormant and needs no additional water in the summer. This is my idea of low maintenance. There are many varieties but check out Camassia quamash ‘Orion’ for a seriously blue hit of heaven. Plant them behind a group of Black Eyed Susan (Rudebeckia) or Asters or Sedum ‘Xenox’, cousin to S. ‘Autumn Joy’.
  4. Dwarf Daffodils – go for the shorties and plant these with other “require good
    drainage” kinds of plants like the heathers, or dwarf conifers, or even good old common Candy Tuft. This is a great way to get an easy burst of color – no muss, no fuss and no rubber bands on the dying foliage please. All these plants have the same needs, low water, good drainage and SUN.
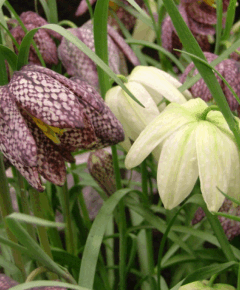
  5. Fritilarria – very unusual looking, graceful, everything to gain and nothing to lose but only if you plant them right away. If you leave these in the garage even one day, it’s all over. Plant immediately upon receipt in filtered light. Underneath the edges of a large shrub or small tree would be good.
  6. Lastly, a warning………Scilla is a BAD bluebell bulb that spreads.  There are some trustworthy types of Scilla but too few for the risk………. No Scilla! Getting rid of it is a nightmare, (although I accomplished complete annihilation of it once). The NW has Scilla Hispanica in nearly all areas. It is kinda sweet (cute bluebell flower) but it is a Trojan horse. The seed can easily blow out of your yard to your neighbors yard. It takes both cutting off the flowers before they seed and digging the bulbs up over and over for years to get rid of it.

Read more about it? Click here for The Oregonian blog by Kym Pokorny on Bluebells

How to Prune Your Lavender Plants – Best Practice

How to Prune Your Lavender Plants – Best Practice

How to Make Your Lavender Last for Ten Years-Prune Twice A Year

In late winter, (January and February) pruning lavender is an optimistic and happy task.  If you are in on the secret this is when lavender gets the biggest cut.  (See video below for the how to.) For decades people were taught to prune only in late winter.  This outdated practice does not give you a long lasting plant.

In the fall no one wants to prune their blooming (still colorful if faded) lavender plants.  (NOOOOO! I don’t want to prune them, they are soooo pretty right now!)  I agree gentle gardener, but please let me persuade you to try this new technique and prune them the second time.

Trimming lavender back by half (late summer/early fall) and trim again in late winter/early spring.  This gets you ten years instead of  three in  your garden! Learning how to do this in a garden coaching appointment is a confidence builder. Once you learn how, you can have fabulous low care lavender the rest of your gardening life.

Another bonus to pruning twice; lavender can look tidy for winter if we prune them correctly in the fall.  How to properly prune lavender. The video was created by our own Stonegate Lavender grower from West Linn (who sadly closed up shop in 2015). I agree with her technique and her video is still live, teaching people the right technique.

Don’t worry, you don’t have to use a lavender saw, you can use your trusty Felco pruners or other clippers – the lavender saw Sarah is using is pretty cool and is old school as in 1500’s.

Lavender is an excellent plant for feeding our native bees and endangered bumble bees.  Not any old plant will do for natural bees. Contact me for a landscape design that includes easy care colorful plants that are good for our pollinators.